
Support Guidelines/General Care and Maintenance
General care and Maintenance
Your reclaimed wood is finished with a high grade & eco friendly wax-oil making it very tough.
This wax-oil takes 12 hours to dry but a couple weeks to fully ‘cure’ – extra care should be taken within this two week period.
Please do not place your furniture next to direct heat (radiators, fireplace etc) or expose straight away to direct sunlight. Heat can cause reclaimed wood to crack, so avoid placing furniture directly in front of a radiator or heater. Hot dishes and cups can have the same effect, so always use a coaster or mat on reclaimed tables to avoid cracks, burns or ringmarks.
Please do not leave your furniture wrapped for more than 24 hours. This is because the timber needs to adapt to its new surroundings as quickly as possible. Leaving your furniture wrapped will limit this and may threaten the furnitures structural integrity.
For daily maintenance wipe with a damp lint-free cotton cloth.
For optimal results surfaces should be treated with OSMO SPRAY CLEANER. Regular furniture polish will also help maintain your furniture.
Shelf Instructions
How strong your shelf is will depend on how well it is fixed to the wall, and different walls will require different fixings to ensure a firm hold. For our shelf brackets we recommend using countersunk screws up to 5mm in diameter. You will also need an appropriate wall plug or anchor.
Brick / Masonry Wall
A brick wall will be the best option for a strong shelf. With a brick wall you’ll need a decent rawlplug to secure the shelf, which is an appropriate size for the screws you are using. We recommend using 5mm countersunk screws that are at least a 40mm in length.
Plasterboard / Stud Wall
For a stud wall it is best to screw at least one shelf bracket (both if possible!) directly into the wooden vertical studs behind the plasterboard. You can locate these using a detector. You will not need a wall plug when fixing into the wooden stud, just drill a guide hole and screw the shelf in using a 5mm countersunk screw that is at least 40mm in length.
If you cannot screw both brackets into a stud then you can fix one bracket to the plasterboard using an appropriate wall plug or anchor. Please be aware that this will only be suitable for holding lightweight items. We recommend using something like a spring toggle / butterfly anchor.
Putting the shelf up
Before drilling any holes into your wall you should use a detector to check for any pipes or cables behind the wall, as you will need to avoid these.
Mark where you would like the shelf brackets to be, using a spirit level to ensure that they are level. Once you are happy with the placement, mark out the locations of the screw holes for the first bracket with a pencil.
Drill guide holes for your screws, or holes large enough for your wall plugs or anchors where you have marked the screw holes. If drilling into a brick wall you will need to use a masonry drill bit and might need to use the hammer setting on your drill.
Insert any plugs you are using to the holes, knocking gently with a hammer to get them flush with the wall if needed.
You can now screw the first bracket to the wall using a screwdriver.
Mark the position of your second bracket, double-checking with a spirit level that it is level with the first bracket, and repeat this process.
Once your brackets are up, you can place the shelf and check one last time that it is level before screwing it to the brackets.
Wooden legged Items
Wooden Legged Tables
Wooden Legged Benches
Wooden Legged Vanity Units/Coffee Tables
Wooden Legged Corner Desk
The legs will be sent flat packed and require screwing in either by a standard crosshead screwdriver or impact drill. Screws will be provided
Wooden legged ‘A Frame’ items:
Insert leg frame 1 into leg area 1 as pictured. Screw into the holes that have been made. Screw in to the side as pictured. Repeat for leg frame 2 into leg area 2. Please ensure screws are tightened
Northlands Vanity units- Shelf to be placed and rested on top of the two supports.
Wooden legged Tables and Desks:
Insert the middle brace in between the two leg frames and line up the pencil marks as pictured. Screw into place. Please ensure screws are tightened
Single legged items
Each leg will be numbered, please screw each leg into the slot with the corresponding number as pictured. Please ensure screws are tightened.
Please advise if you need further support
Door Installation
As stated in our listings, we recommend seeking advice from a professional for installation of our sliding doors. However, our door hardware will come with printed instructions for installation. You can also find instructions online here for our popular rail sizes here too;
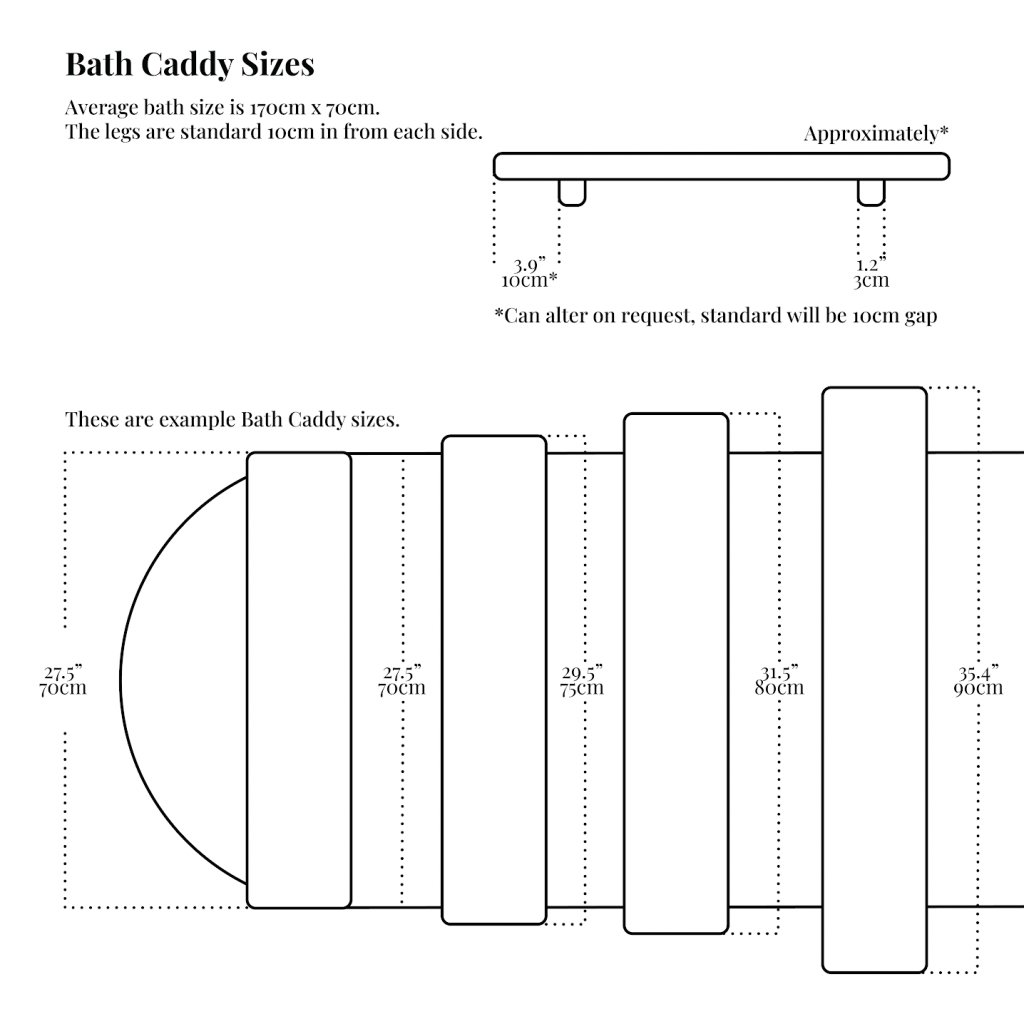
How to measure your bath to order a bath caddy
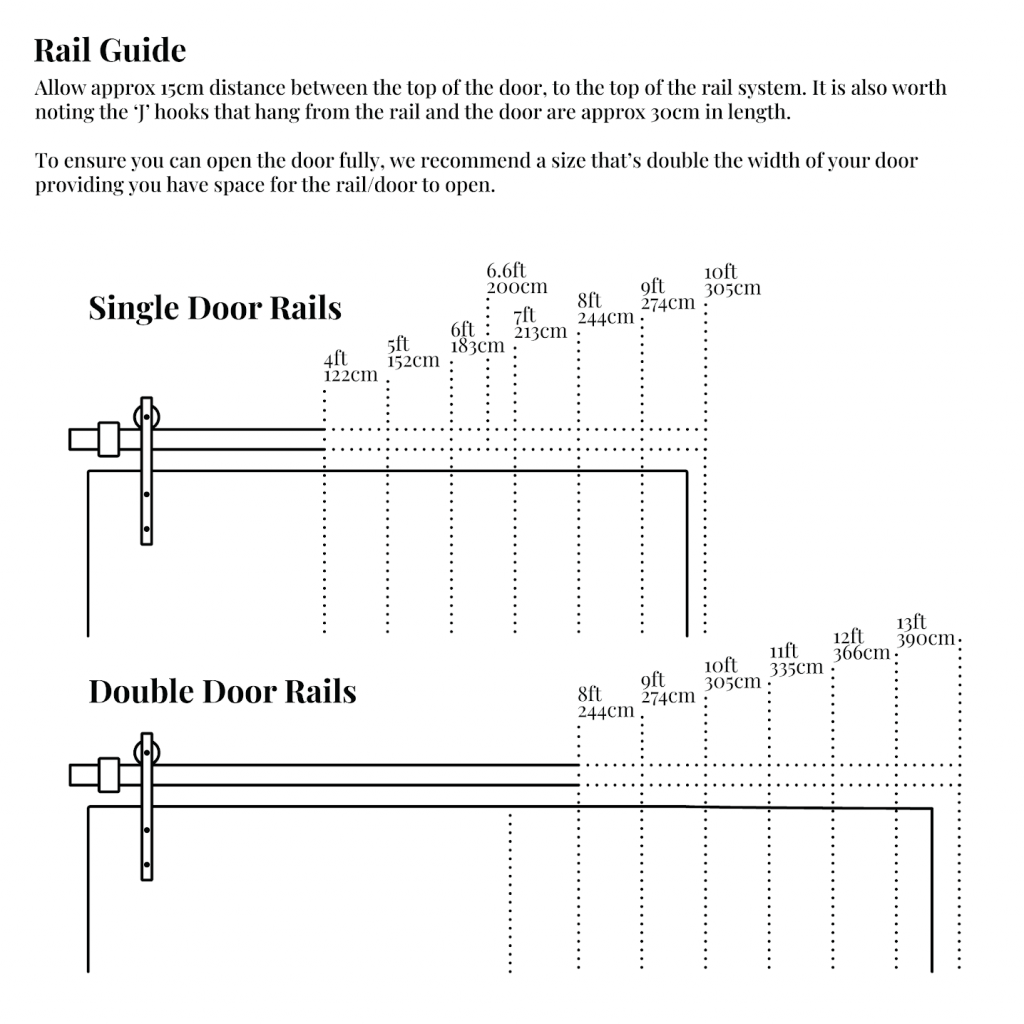
How to choose the right rail size for your door
Use of Furniture Outdoors
Please let us know if you would like your piece of furniture to be used outside and we will treat this accordingly. Even though we treat our outdoor furniture to be weatherproof, a rainproof cover is strongly recommended, especially for the winter months or for any periods that the table is not being used. We suggest that you apply a coat of finish once or twice a year.
If you want to keep your piece looking fresh, please get in contact with us and we will happily point you in the right direction.